Published: 14 Nov 2025
This is the ultimate fudgy dairy free brownie recipe, engineered for a dense, gooey, and intensely chocolatey result. One bowl, no mixer, no dairy!
Here at Joymelife, we believe that dairy-free desserts shouldn’t be a compromise. They should be an indulgence. This recipe is pure, unadulterated indulgence. It’s a one-bowl wonder that will become your new back-pocket secret weapon.
Why This Is the Fudgiest Brownie Recipe You’ll Ever Make
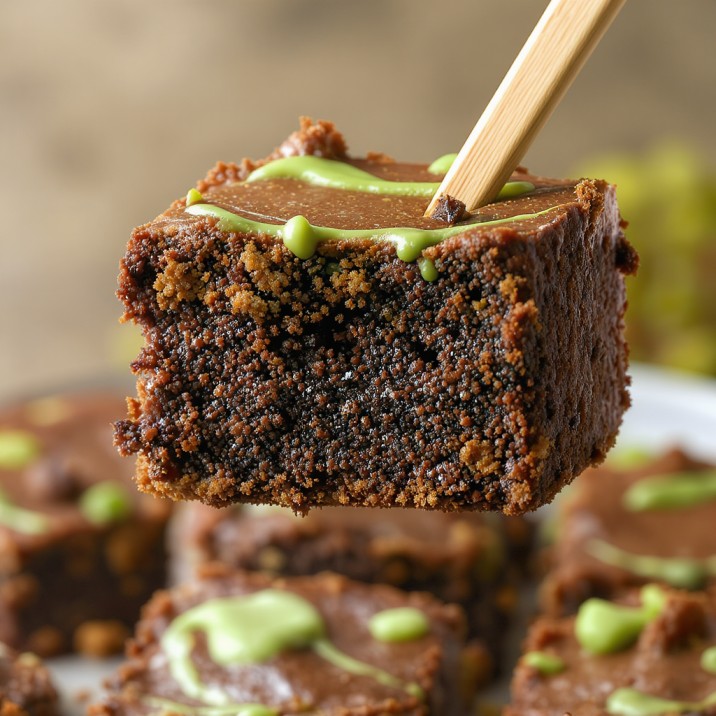
- Ultra Fudgy, Not Cakey: We are building this for density. The texture is closer to a chocolate lava cake or a rich truffle than it is to a chocolate cake.
- Intense Chocolate Flavor: We’re using a “double-chocolate” trick—both melted dairy-free chocolate and cocoa powder—to create a complex, deep flavor.
- That Signature Crinkly Top: Yes! You can get that beautiful, shiny, paper-thin crust without any butter. I’ll show you exactly how.
- Shockingly Simple (One Bowl!): You don’t need a stand mixer. You don’t need to cream any butter. All you need is one bowl, a whisk, and a spatula.
The Science of Fudgy: The 3 Key Secrets
“Fudgy” isn’t an accident. It’s a choice. While a “cakey” brownie has more flour and leavening (like baking soda) to create a light, airy crumb, a “fudgy” brownie is all about minimizing air and maximizing fat and moisture.1
Secret #1: Fat (Oil is King, Not Butter)
This is the most important secret. To get a fudgy texture, you need a high fat-to-flour ratio.
- Why Oil? Butter is only about 80-85% fat; the rest is water and milk solids. Oil is 100% pure fat. By using oil, we are packing in more fat, which coats the flour proteins and inhibits gluten development (the #1 enemy of fudginess!). This results in a denser, moister, and richer brownie.
- Bonus: You don’t have to melt it or soften it. It’s ready to go.
Secret #2: The Chocolate (Double the Chocolate, Double the Fudginess)
A good brownie uses cocoa powder. A great brownie uses melted chocolate. A fudgy brownie uses both.
- Melted Chocolate: This is part of our fat content. It adds cocoa butter, which solidifies as it cools, creating that dense, truffle-like “chew.”
- Cocoa Powder: This adds the intense, dark, slightly bitter chocolate flavor that balances the sweetness.
Secret #3: The Mix (Less Air = More Fudginess)
This is all in the technique.
- No Stand Mixer: You don’t want to “cream” sugar and fat. Creaming is a technique used to whip air into a batter to make it light and fluffy (i.e., cakey).2
- Whisk & Fold: We will use a whisk just to combine the wet ingredients, and a spatula to gently fold in the dry. Minimal mixing = minimal air = maximum fudginess.

The All-Star Ingredients (Homemade Recipe)
- Oil: Any neutral oil. Vegetable, canola, or grapeseed oil are perfect. (Melted coconut oil works, but will add a slight coconut flavor).
- Dairy-Free Chocolate: The most important ingredient. Use a 4-oz (113g) bar of dairy-free dark chocolate (55%-70% cacao is great) or 3/4 cup of dairy-free chocolate chips (like Enjoy Life or Guittard).
- Sugar: Regular granulated sugar is key. It not only adds sweetness but also dissolves into the fat to help create the shiny, crinkly top.
- Eggs: These are essential for structure, leavening, and that crinkly top. (See variations for a vegan/flax egg version).
- Cocoa Powder: Use a high-quality unsweetened cocoa powder. (More on this below).
- Flour, Vanilla, Salt: The supporting cast.
Cocoa Powder: Natural vs. Dutch-Process
A quick note for the baking nerds! You’ll see two types of cocoa powder.
- Natural (like Hershey’s): More acidic, gives a sharper, classic “brownie” flavor.
- Dutch-Process (like Droste): Alkalized to be darker and smoother.The good news? Because this recipe doesn’t use baking soda (a chemical leavener), you can use either one! I personally love a mix of both, but use whichever you have on hand. According to food science experts at sites like King Arthur Baking, this flexibility is common in recipes that get their lift from eggs alone.
Equipment Needed
- 8×8 inch (20×20 cm) baking pan (metal is best)
- Parchment paper
- One large, microwave-safe mixing bowl
- A whisk
- A rubber spatula
Step-by-Step Instructions for Fudgy Brownies
This is the core fudgy dairy free brownie recipe.
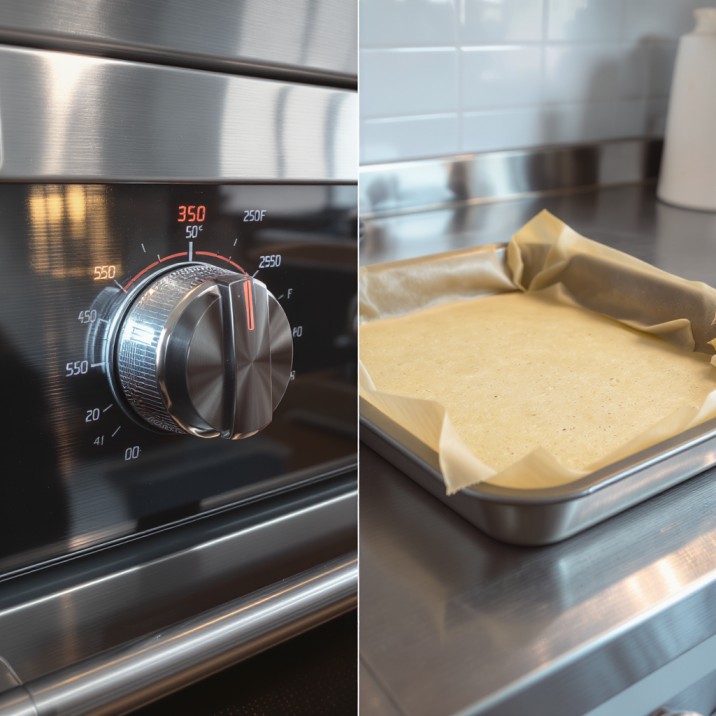
Step 1: Prep & Preheat (The 8×8 Pan)
- Preheat your oven to 350°F (175°C).
- Grease your 8×8 pan, then line it with parchment paper, leaving 2-inch “handles” of paper hanging over two opposite sides. This “sling” is the secret to lifting the brownies out cleanly later.
Step 2: Melt the Base
- In your large, microwave-safe bowl, combine 1/2 cup (120ml) of neutral oil and the 4 oz (113g) of chopped dairy-free chocolate.
- Microwave in 30-second bursts, stirring in between, until the chocolate is smooth. (Alternatively, melt in a double boiler).
- Let this mixture cool for just a minute or two so it’s not piping hot.

Step 3: Whisk in Sugar & Eggs (For the Crinkly Top!)
- Add 1 1/4 cups (250g) of granulated sugar to the warm chocolate/oil mixture and whisk well.
- Add 2 large eggs and 1 tsp of vanilla extract.
- Now, whisk vigorously! Whisk by hand for a full 60 seconds. The mixture will turn thick, glossy, and smooth. This step is the #1 secret to creating that shiny, crinkly top. You are dissolving the sugar and creating a meringue-like base.
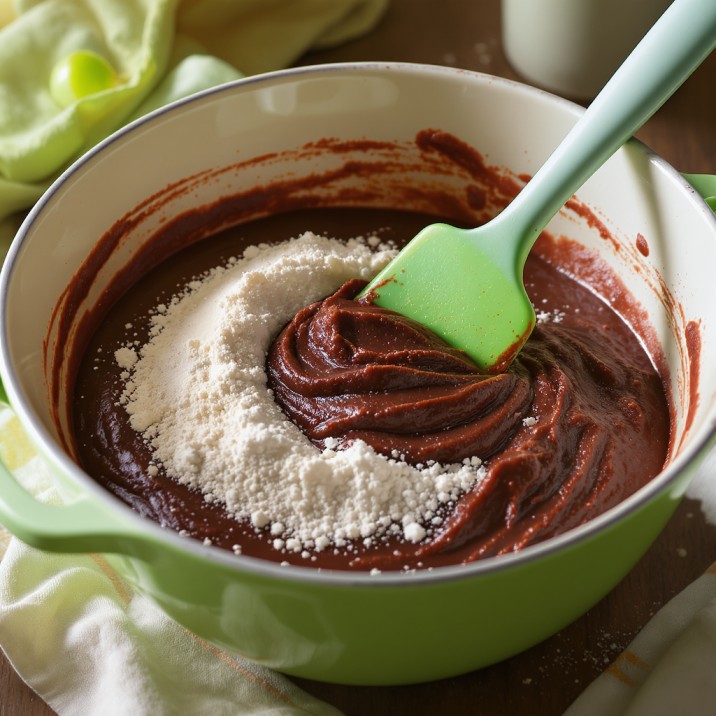
Step 4: Fold in the Dry Ingredients (Do Not Overmix!)
- Set a fine-mesh sieve over your bowl. Add 3/4 cup (75g) all-purpose flour, 1/2 cup (50g) unsweetened cocoa powder, and 1/2 tsp salt.
- Sift the dry ingredients directly into the wet mixture.
- Using your rubber spatula (not the whisk!), gently fold the dry ingredients in.
- STOP as soon as you see the last streaks of flour disappear. This is the most critical step. Overmixing will develop gluten and make your brownies tough and cakey.
- Gently fold in another 1/2 cup (85g) of dairy-free chocolate chips (optional, but highly recommended).
Step 5: Bake to Perfection (The “Underbake” Trick)
- Pour the thick, decadent batter into your prepared pan and smooth the top.
- Bake at 350°F (175°C) for 30-35 minutes.
- THE FUDGY TEST: This is where people go wrong. If a toothpick inserted into the center comes out clean, you’ve gone too far and they will be cakey. You want the toothpick to come out with moist, fudgy crumbs attached (but not wet, raw batter).
- The “Underbake” Trick: The golden rule of brownies is “when in doubt, take them out.” The brownies will continue to cook and set from the residual heat in the hot pan. This “carry-over cooking” is your ally in the quest for fudginess.
- Let the brownies cool completely in the pan (at least 1-2 hours) before lifting them out with the parchment sling and cutting. This is excruciating, but it’s what allows the center to set into that perfect, dense, fudgy texture.
Expert Tips and Tricks for Gooey Perfection
- The 8×8 Pan is Law: Do not use a 9×9 pan. It will make your brownies too thin and they will overbake. This recipe is specifically calibrated for the thickness of an 8×8.
- The Espresso Powder Hack: Add 1 tsp of instant espresso powder with your dry ingredients. It doesn’t make the brownies taste like coffee; it just makes the chocolate taste deeper and more intense.
- The “Slam” Trick: As soon as you take the pan out of the oven, give it a good, firm “slam” on the countertop. This gently deflates the brownies and compacts them, resulting in an even denser, fudgier center.
- Clean Cuts: For those perfect, sharp-edged squares, use a hot knife. Run a large chef’s knife under hot water, wipe it dry, make one cut, and repeat.
Tips for Success: A Quick-Hit List
- Do: Use oil, not butter or vegan butter.
- Do: Whisk the eggs and sugar for a full minute.
- Do: Use an 8×8 metal pan.
- Do: Underbake slightly! Look for moist crumbs.
- Don’t: Use a stand mixer or overmix the batter.
- Don’t: Cut them while they are warm.
Recipe Variations and Possible Substitutions
How to Make Them Vegan Fudgy Brownies
This fudgy dairy-free brownie recipe is easily made vegan!
- Replace the 2 eggs with 2 “flax eggs.”
- To make: Mix 2 tablespoons of ground flaxseed meal with 6 tablespoons of water. Let it sit for 10-15 minutes in the fridge until it becomes thick and gelatinous.
- Add this gel where you would add the eggs. This will make the brownies even denser and fudgier!
How to Make Them Gluten-Free & Dairy-Free
- Simply replace the 3/4 cup of all-purpose flour with 3/4 cup of a high-quality 1-to-1 gluten-free baking flour blend (like Bob’s Red Mill 1-to-1).
Fun Mix-Ins
- Nutty: Fold in 1/2 cup of toasted, chopped walnuts or pecans with the chocolate chips.
- Salty: Sprinkle the top of the batter with flaky sea salt before baking.
- Peanut Butter: Dollop 1/4 cup of peanut butter on top of the batter and use a knife to swirl it in.
Serving and Pairing Suggestions
- Serving Suggestions:
- Dust with powdered sugar.
- Serve slightly warm (10 seconds in the microwave).
- Serve with a giant scoop of dairy-free vanilla ice cream.
- Drizzle with dairy-free caramel or chocolate sauce.
- Serve with a tall glass of cold oat milk.
- Serve with fresh raspberries.
Storage and Reheating Tips (They Get Fudgier!)
- Storage: These brownies are fantastic on Day 1, but they are even fudgier on Day 2. The flavors settle, and the texture becomes denser. Store them in an airtight container at room temperature for up to 4 days.
- Reheating: A 10-15 second pop in the microwave will bring a single brownie back to that perfect, melty, fresh-from-the-oven state.
- Freezing: These freeze beautifully. Cut them into squares, wrap them individually in plastic wrap, and store them in a freezer bag for up to 3 months.

Recipe FAQs (Common Questions About This Recipe)
Q: Why did my brownies come out cakey?
A: Two likely culprits: 1) You overmixed the batter after adding the flour, or 2) You overbaked them. Remember, stop mixing as soon as the flour disappears, and pull them from the oven when the toothpick still has moist crumbs!
Q: Why isn’t there any baking soda or powder?
A: Because we don’t want lift! Baking soda/powder creates air and makes things “cakey.” For this fudgy dairy free brownie recipe, the only leavening we want comes from the eggs, which is just enough to keep them from being a dense brick.
Q: Can I use vegan butter instead of oil?
A: You can, but it will change the texture. Vegan butters, like dairy butter, contain water. This water creates steam and will make the brownies slightly “chewier” or “fluffier,” not as purely “fudgy” as oil.
Conclusion: Your Search for the Best Brownie is Over
You did it! You now have the ultimate fudgy dairy-free brownie recipe. This is the one that will make your friends and family ask, “Are you sure these are dairy-free?” It’s rich, decadent, and foolproof.
This recipe proves that “fudgy” is a technique, not a list of ingredients.
Now it’s your turn!
If you make this recipe, please leave a comment below! Let us know how they turned out. Did you add walnuts? Did you try the flax egg? We at Joymelife want to hear all about it!

Fudgy Dairy Free Brownie Recipe
Equipment
- 8×8 inch (20×20 cm) baking pan (metal is best)
- Parchment paper
- One large, microwave-safe mixing bowl
- A whisk.
- A rubber spatula
Ingredients
- 1/2 cup 120ml Neutral Oil (Vegetable, Canola)
- 4 oz 113g Dairy-Free Dark Chocolate (bar or chips)
- 1 1/4 cups 250g Granulated Sugar
- 2 large Eggs
- 1 tsp Vanilla Extract
- 3/4 cup 75g All-Purpose Flour
- 1/2 cup 50g Unsweetened Cocoa Powder
- 1/2 tsp Salt
- 1/2 cup 85g Dairy-Free Chocolate Chips (Optional)
Instructions
- Preheat & Prep: Preheat oven to 350°F (175°C). Line an 8×8 metal pan with parchment paper, leaving "handles" on the sides.
- Melt: In a large, microwave-safe bowl, melt the oil and 4oz of chocolate in 30-second bursts, stirring until smooth.
- Whisk (The Crinkly Top Secret): Whisk the sugar into the chocolate mixture. Add the eggs and vanilla and whisk vigorously for 1 full minute until the batter is thick, glossy, and smooth.
- Fold (Don't Overmix!): Sift the flour, cocoa powder, and salt over the bowl. Use a spatula to fold the dry ingredients in until just combined. Stop when you see the last streaks of flour.
- Bake (The Fudgy Test): Fold in the optional chocolate chips. Pour the batter into the prepared pan. Bake for 30-35 minutes. A toothpick inserted in the center should come out with moist, fudgy crumbs, not clean.
- Cool: Let the brownies cool completely in the pan (at least 1-2 hours) before lifting them out and cutting them. This allows the fudgy center to set.
Notes